1. Form the basic concept of vector graphics processing;
2. Understand the effects of CorelDraw image processing methods;
3. Learn to use CorelDraw for plane vector image processing.
2. Experimental preparation knowledgePlease refer to the appendix
3. Experimental requirements(Please read the appendix carefully before starting the experiment)
1. Use CorelDraw to make a simple advertisement picture.
2. Modify the basic parameters of the result of the previous step (image size, color, brightness, etc.)
3. Save the result of the previous step as a bitmap, and then use PhotoShop to add lighting effects. (Optional: interested students can save the picture in the format supported by AutoCAD and open it in AutoCAD for further processing)
4. Use CorelDraw's unique deformation tools to make some special effects of gradients.
Four, thinking questions1. Does the deformation and gradient tools in CorelDraw have corresponding or similar functions in PhotoShop? Why?
2. Compared with PhotoShop, how does CorelDraw provide different functions from PhotoShop when performing image processing?
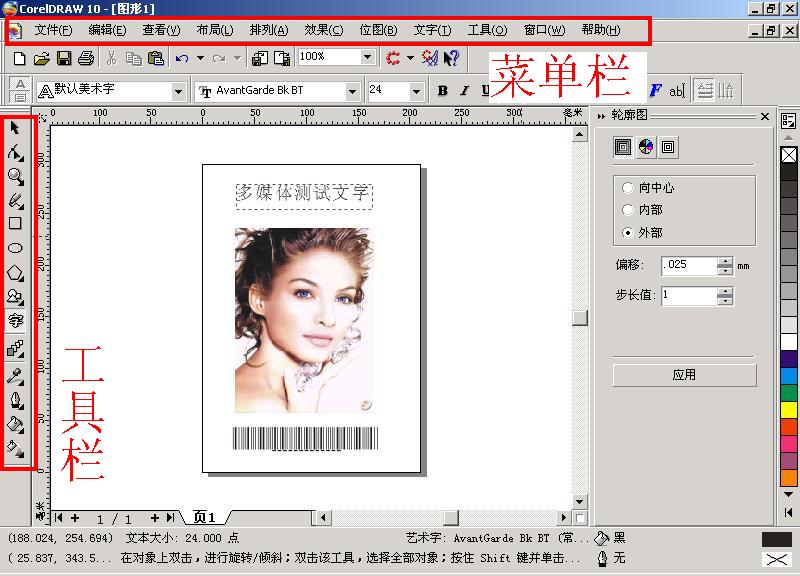
Appendix CorelDraw basics 1. Introduction to CorelDraw 1. Introduction to CorelDraw operation interface (1) At the top of the screen is the menu bar, including 11 menu items: file, edit, view, layout, arrangement, effect, bitmap, text, tool, window, and help. (2) Below the menu bar are CorelDRAW9 commonly used toolbars. Common tools include: create new file, open file, save file, print, cut, copy, paste, restore, restore, redo, redo, input, output, Display scale level, application startup disk, Corel Graphics community, help, etc.
(3) The next layer is the property bar, which displays various properties of various objects.
(4) The left side of the screen is the toolbox. From top to bottom are: selection tool, selection tool menu, display scale menu, hand-drawn tool menu, rectangle, ellipse, polygon menu, text tool, interactive coloring tool menu, Interactive transparency tool menu, interactive gradient tool menu, eyedropper tool menu, frame tool menu, fill tool menu (here, any button with a small triangle in the lower right corner of the button indicates that there is a hidden tool, you can: press the left Press and hold the key, wait for the menu to come out, then release the mouse and click the tool).
(5) Usually, there is a default color palette on the right side of the screen, and CorelDRAW9's dockworker will also appear on the right side of the screen.
2. File formats supported by CorelDraw:
(1) The default saving format is "* .cdr";
(2) Using the "Save As" in the menu "file" can also save into other vector image formats (for example: * .dxf supported by AutoCAD)
(3) Use the "Export" in the "file" menu to output the created pictures as files in other formats (such as our most commonly used BMP pictures, or the most popular Acrobat files, * .PDF)
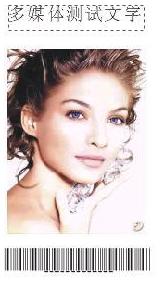
In this part, we will make a picture similar to the one shown above (the picture has three parts: an existing image as the background, a string of text as the title, and a laser barcode), this is a simple Product packaging.
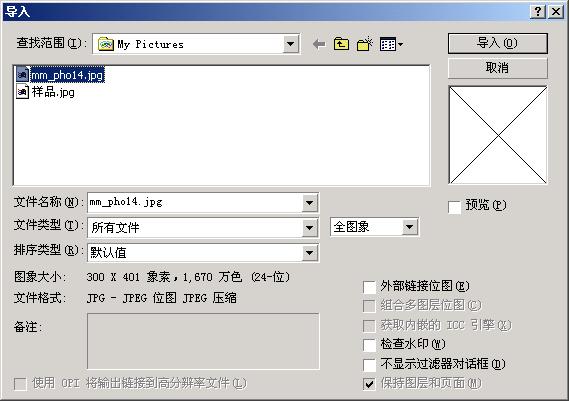
(1) Input the existing picture as the background, the operation steps are: "Import" in the "File" menu (Chinese version is "File"-> "Import"), the following dialog box appears, select the appropriate file; Then drag the mouse on the screen to draw a rectangular area (the content of the inserted picture will be displayed in this area)
(2) Insert another line of text information in your own picture. The operation steps are: select "word" (ie text tool) in the toolbox; drag the mouse on the picture to specify a rectangular area (the area displays the upcoming input Text); enter the required text; change the size of the text and other auxiliary information.

(3) To draw a laser bar code of a commodity, the operation steps are: "Inert BarCode" in the "edit" menu; select the required bar code type (different countries and standards organizations have developed a variety of laser bar codes); enter the digital information in the bar code ; Determine the position of the bar code on the picture (use the mouse to select the bar code and drag to a suitable position). Finally get such a picture.
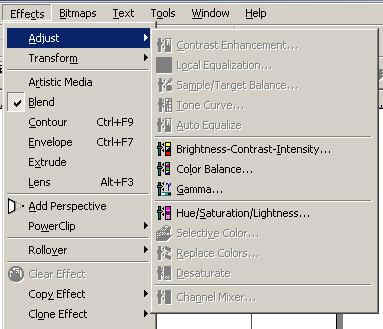
1. CorelDraw vector graphics processing
Similar to PhotoShop software, although CorelDraw processes vector graphics instead of bitmaps, it can still perform various processing in PhotoShop. As shown in the figure below, you can find various image processing options under the "Effect" submenu in the menu bar.
Example in English
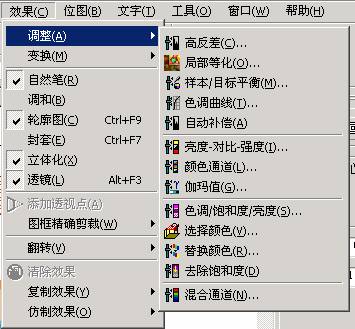
Chinese version example
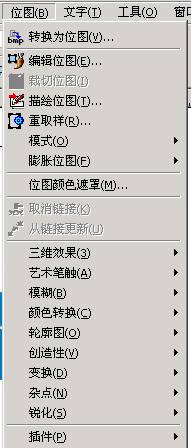
2. Bitmap processing of CorelDraw
In CorelDraw, you can convert vector pictures you make into bitmap format. Therefore, some image processing processes that exist only in bitmaps can be performed. Corresponding operations can be found under the "Bitmaps" menu item in the menu bar. As shown below.
It is worth mentioning that in the toolbar of CorelDraw, some icons have a small black triangle in the lower corner. If you click on the small triangle, more icons will pop up. For example, the following figure is a menu of pop-up icons. Each icon shown in the figure below belongs to the "distortion, gradation and three-dimensional effect" function involved in this section.
![]()
Using the "rectangle tool" and "interactive blending tool" (English version is "Rectangle Tool" and "InterAcTIve Extrude Tool") can produce the effect shown in the figure below. The specific steps are as follows: (1) Place a large ellipse and a small ellipse on the picture with a certain distance between them; (2) Select the gradient icon in the "Interactive Blending Tool" and change it to a prompt on the screen To select the state, first select the first ellipse, then drag the mouse to select the second ellipse.

If you want to fill the "Object" in the picture with color, you can fill the object with the "Fill Tool" in the toolbar.
Guangzhou Ehang Electronic Co., Ltd. , https://www.ehangmobile.com